A/B 12 Audio In Switch
Product Info
A/B 12 Audio In Switch is a free (and open source) rack extension for Reason, the music DAW produced by Reason Studios. This 2U utility lets you switch between 12 audio stereo inputs using various approaches (similar to the built-in Spider Audio Merger but with switchable inputs).3 control modes for the 12 inputs
- in single mode, only one input is active at a time and you can switch to another with a single click. Perfect for A/B testing!
- in multiple mode, any combination of inputs can be active at a time (similar to the Solo concept).
- in instrument mode, you control the switch as if you were playing an instrument. Perfect for quickly coming up with creative ideas or live performance.
A/B bank switching
- The switch is split into 2 banks of inputs which can be independently turned on or off. A convenient control also lets you instantly toggle between the 2 banks, effectively implementing another level of switching.
External control
- 12 Gate In inputs lets you control the switch from another device
- 12 Gate Out outputs lets you control other devices from the switch (ex: a Kong device).
Miscelaneous features
- Each switch can be labeled independently.
- Each switch has its own volume control.
- A soften toggle helps in eliminating clicks and pops that can occur during switching.
Front

Folded Front

Back

Usage
I/O
- Connect the audio outputs (stereo pair or mono) to any of the 12 inputs on the back of the rack, in Bank A and/or Bank B
- Connect the Main Out audio output (stereo pair or mono) to an audio input source (for example, a Mix Channel Input, a Combinator From Devices, a Line Mixer Audio In N, etc...)
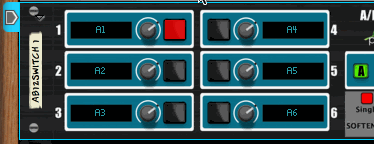
Input Switches
- You can modify the label for each input switch on the front of the device by double clicking the LCD display in each bank (by default the label is A1, A2, etc...).
- You can adjust the volume for each input switch on the front of the device. The toggle called Volume Change Filter on the back of the device controls how the volume changes when you turn a volume knob: by default a small filter is applied so that the volume changes are not too abrupt. You can disable this feature by setting this control to the Off position.
- You then toggle each input switch by either clicking on the button (for Single and Multi. modes), or using a midi keyboard/note lane (for Instr. mode).
What to do when you hear clicks and pops
If you hear clicks and pops when you switch, you may want to turn the SOFTEN button on: this does a very short (64 samples) linear cross-fade between the 2 input sources, thus softening the transition. The waveform at the top of the screenshot shows an abrupt switch between 2 sources which results in an audible click. The bottom waveform shows the result when the SOFTEN button is on.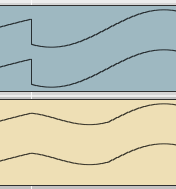
Control Modes
- Select the mode in which you want to control the switch (Single, Multi., Instr.). By default, Single is selected. (see below for more details on modes).
Bank Toggles
- Each bank (Bank A and Bank B) can be individually turned on or off by clicking on the bank letter. When a bank is off, all inputs from this bank are disabled.
- The control in the middle of the device is the bank toggle. It allows to instantly toggle between Bank A and Bank B. For example, by connecting only A1 and B1, you can easily recreate the behavior of the A/B Audio & CV Switch and its convenient one knob switching.
Modes
Single Mode (Single)
- In this mode, there can be at most one input switch enabled at a time (note that there can be none if you click on an already enabled input switch). Clicking on a disabled input switch will instantly enable it while at the same time disabling whichever switch was already enabled (radio group behavior).
- You can control the switches using the keyboard. The mapping is the same as the one used in Instr. mode. Hitting a key will instantly toggle the appropriate switch (if multiple keys are pressed at the same only one switch will be selected).
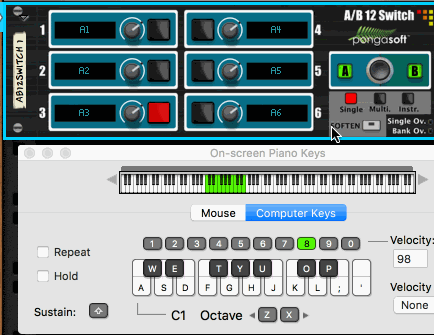 For backward compatibility reasons, the Keyboard toggle on the back of the rack needs to be enabled in order for Single mode to accept keyboard input. In addition, you need to make sure that the sequencer track for this device is selected in order to receive the notes from the keyboard.
Multiple Mode (Multi.)
In this mode, the input switches are indepedent of each other and there can be as many switches enabled as you want. Clicking on an input switch toggles its state (enabled/disabled) (this is equivalent to how Solo works in a mixer).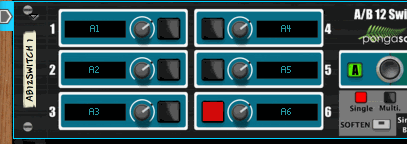
Instrument Mode (Instr.)
In this mode, the input switches are indepedent of each other and there can be as many switches enabled as you want. What differentiates this mode from the previous one is how you enable each input switch: you "play" it like an instrument. For example, A1 will be enabled as long as any C note is being held. As soon as you release the note, the switch is disabled.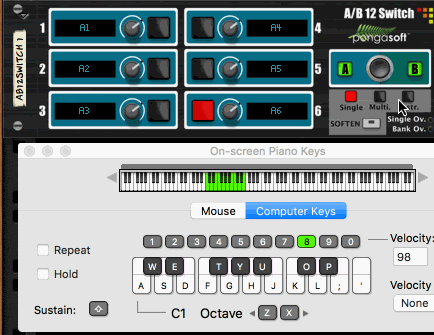
The table below shows the mapping between Inputs, Notes, and Midi values.
| Input Switch | Midi | Note Value |
|---|---|---|
| A1 | 12*n+0 | C |
| A2 | 12*n+1 | C# |
| A3 | 12*n+2 | D |
| A4 | 12*n+3 | D# |
| A5 | 12*n+4 | E |
| A6 | 12*n+5 | F |
| B1 | 12*n+6 | F# |
| B2 | 12*n+7 | G |
| B3 | 12*n+8 | G# |
| B4 | 12*n+9 | A |
| B5 | 12*n+10 | A# |
| B6 | 12*n+11 | B |
You need to make sure that the sequencer track for this device is selected in order to receive the notes from the keyboard.
In this mode you can record notes in the sequencer!
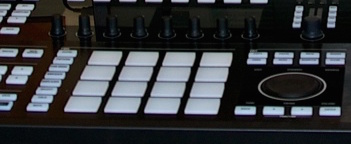
Because you can play this mode on any octave, and because hardware pads are usually mapped starting on a given C note, you can easily trigger the switches using a hardware pad.
Automation
Setup
All the controls can be automated. The Mode Select, SOFTEN and Volume [X] controls can be automated by right clicking on the control and selecting "Edit Automation". Due to some limitations in the Reason Development Environment, the other controls cannot be automated the same way and require the use of the Track Parameter Automation menu in the sequencer as shown in this screenshot: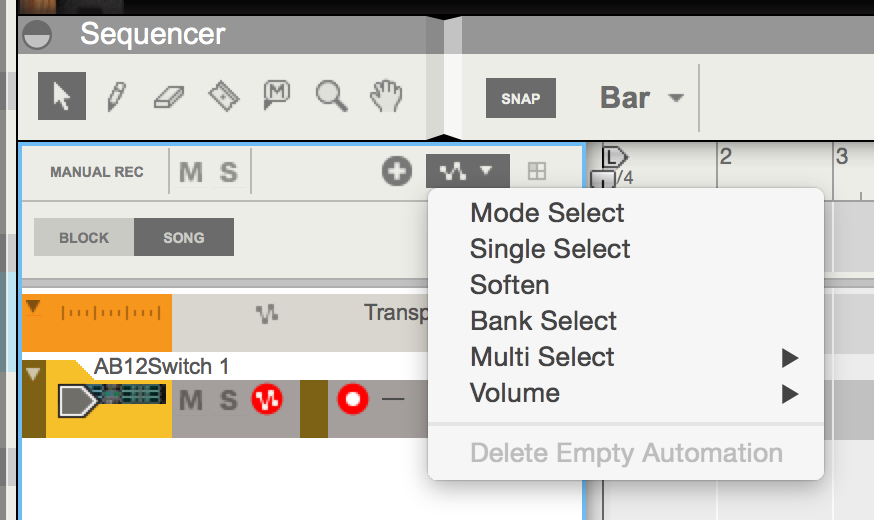
In order for the Track Parameter Automation menu to be present, the switch must have a track in the sequencer (it should be created automatically for you, but in the event it is not, right click on the device in the rack and select "Create Track for <Device>")
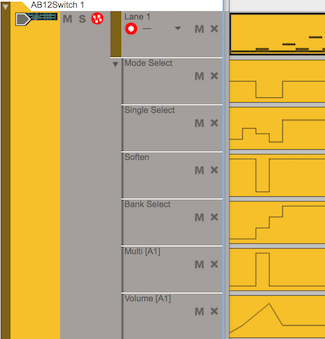
Automating the switches
The way you automate the switches depends on which mode you are in:- In Single mode, you use the Single Select automation option. Since there can only be one switch enabled at a time (or none at all), you then have 13 values to choose from, NONE, Single [A1 - A6], Single [B1 - B6]
Alternatively, you can use the Note Lane associated with the track and record notes (either live or by painting/drawing them) like you would with an instrument.
- In Mutli. mode, you use the Multi -> Multi [A1 - B6] automation option. Each switch is indepedent of the others, so you automate each switch individually. You choose between On and Off for each switch.
- In Instr. mode, you actually use the Note Lane associated with the track and you record notes (either live or by painting/drawing them) like you would with an instrument. Check the Instrument Mode section for the note mapping.
Note that the switch automation is only effective when the proper mode has been selected. For example, if you automate Single mode, but the device is set to Mutli. mode, then Single Select automation is ignored.
Example
Mapping
All the controls can be mapped to an external device. The Mode Select, SOFTEN and Volume [X] controls can be mapped by right clicking on the control and selecting "Edit Remote Override Mapping...". Due to some limitations in the Reason Development Environment, the other controls cannot be mapped the same way and require the use of the Options/Remote Override Edit Mode top menu. Once you select this option, the rack should look like this: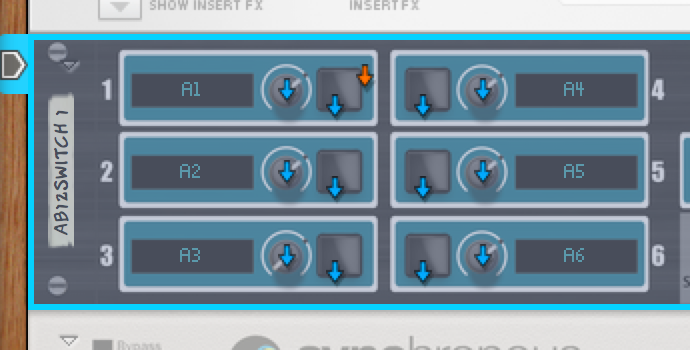
In Single mode (with Keyboard enabled), and Instr. mode there is a de facto mapping: any midi keyboard (or pad using the same kind of mapping) will automatically work to trigger the switches.
CV Control
The device can be controlled via CV: you can control the banks (CV Banks) Single mode (CV Single State) and Instrument mode (Gate In). The switch can also control other devices in the rack (Gate Out)
The front of the device has a small blue LED light for CV Banks and CV Single State. The LED will be lit when the control is active.
CV Banks
This CV control allows you to control the A & B banks. A switch on the back of the device controls how the device interprets the CV values:| No Bank | Bank A | Bank B | Bank A+B | Example (Matrix) | |
|---|---|---|---|---|---|
| Unipolar | [0, 0.25[ | [0.25, 0.5[ | [0.5, 0.75[ | [0.75, 1] | 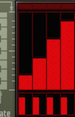 |
| Bipolar | -1 | ]-1, 0[ | [0, 1[ | 1 | 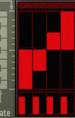 |
| Note | C, C#, D | D#, E, F | F#, G, G# | A, A#, B |  |
- [x, y[ means the range of values from x (included) to y (excluded)
- ]x, y[ means the range of values from x (excluded) to y (excluded)
- [x, y] means the range of values from x (included) to y (included)
- x means only the value x
Bipolar is the default setting.
Single Mode CV
This controls which switch is selected when in Single mode. Typically connected to a Matrix Note CV CV output.| Input Switch | CV Note Value |
|---|---|
| A1 | C |
| A2 | C# |
| A3 | D |
| A4 | D# |
| A5 | E |
| A6 | F |
| B1 | F# |
| B2 | G |
| B3 | G# |
| B4 | A |
| B5 | A# |
| B6 | B |
Works on any octave.
Gate In
The 12 CV inputs individually control which of the 12 switches is selected when in Instr. mode. For example, it can be connected to the first 12 pads in a Kong Gate Out CV output.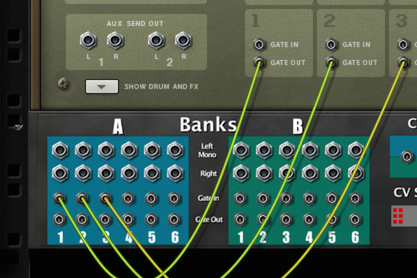
Gate Out
The 12 CV outputs can independently control other devices. As long as a switch is selected, the gate is open (value sent is 1.0). For example, it can be connected to the first 12 pads in a Kong Gate In CV Input.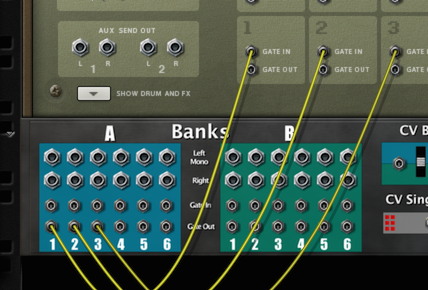
Note that if a switch is selected, but the bank is not, then the gate will closed for this switch. For example, if A1 is selected but Bank A is off then Gate Out for A1 is closed.
LED Lights
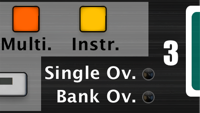 The 2 LED lights on the front of the rack (Single Ov. and Bank Ov.) light up when CV (or keyboard in Single mode) overrides the selection of the switches. For example, if A1 is selected and you press the G key on your keyboard, then B5 will be the newly selected switch and the Single Ov. will be on, as an indicator that this state is not permanent and will not be saved with the song (unless you record it on a Note lane).
Sponsor
pongasoft produces a variety of high quality and free/open source software. If you would like to support my work and help offset the cost of development tools, web hosting, etc. here are a couple ways to do so:
- Send money via PayPal
- Sponsor Me on github
Release Notes
1.3.0 - 2021/10/07
- Support Hi Resolution graphics (Reason 12).
- Updated design.
- Requires Reason 10.1+.
- Source Code v1.3.0
1.2.1 - 2016/10/20
- Fixed issue with Gate In.
- Source Code v1.2.1
1.2.0 - 2016/10/17
- Added keyboard support in Single mode.
1.1.0 - 2015/08/17
- Expanded keyboard control in Instr. to all octaves.
- Added 12 Gate In CV inputs
- Added 12 Gate Out CV outputs
- Changed design of the back to accomodate 24 new sockets.
1.0.1 - 2015/07/13
- Fixed issue when mono signal.
- Fixed issue with soften.
1.0.0 - 2015/07/06
- First release.