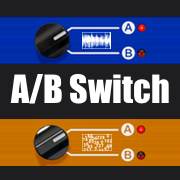
A/B Audio & CV Switch
Product Info
A/B Audio & CV Switch is a free (and open source) rack extension for Reason, the music DAW produced by Reason Studios. This 1U utility lets you switch with one simple click between 2 audio inputs and independently 2 CV inputs.Use the switch as a comparison (A/B testing) tool
Its one-click instant switching capability lets you:- easily audition 2 different versions of audio sources (with an option to soften the transition to eliminate clicks and pops)
- hear the distinction when 2 different CV sources are applied to a device
Use the switch in your production
Since the switch can be automated, you can use it in your production to simplify some tasks, for example:- switch between 2 mutually exclusive audio tracks at various points in your mix (you automate the switch vs automating mute/unmute on 2 tracks)
- switch between 2 different LFOs with very different parameters (you automate the switch vs automating each parameter)
Front

Folded Front

Back

Usage
Audio Switch
- Connect the first audio input (stereo pair or mono) to Input A
- Connect the second audio input (stereo pair or mono) to Input B
- Connect the audio Output (stereo pair or mono) to an audio input source (for example, a Mix Channel Input, a Combinator From Devices, a Line Mixer Audio In N, etc...)
- New in 1.1.0 You can add a label for each input on the front of the device
- Use the knob in the Audio section to select between A and B
What to do when you hear clicks and pops
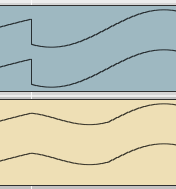
If you hear clicks and pops when you switch, you may want to turn the SOFTEN button on: this does a very short (64 samples) linear cross-fade between the 2 input sources, thus softening the transition. The waveform at the top of the screenshot shows an abrupt switch between 2 sources which results in an audible click. The bottom waveform shows the result when the SOFTEN button is on.
CV Switch
- Connect the first CV input to Input A
- Connect the second CV input to Input B
- Connect the CV Output to any CV input
- New in 1.1.0 You can add a label for each input on the front of the device
- Use the knob in the CV section to select between A and B
CV CTRL vs CV Inputs
The CV CTRL input should not be mistaken with Input A or Input B sockets: its purpose is to control switching (see below for details)Automation
The audio knob, SOFTEN button and CV knob can be automated using standard Reason automation.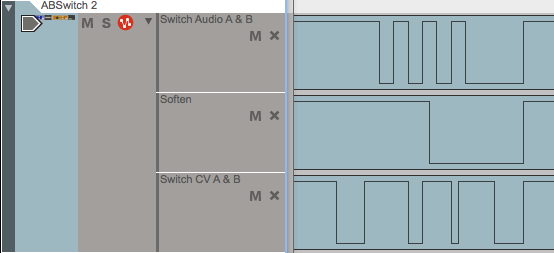
CV Control
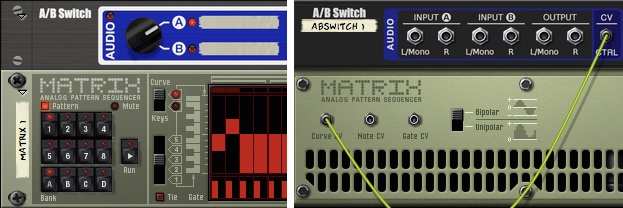
New in 1.1.0 You can control the switches (both audio and CV) using the CV CTRL input sockets on the back of the device. Any positive (or 0) CV value will trigger the B input and any negative CV value will trigger the A input.Setup example
A typical example would be to use a Matrix device:- On the back of the Matrix, select Bipolar (so that it generates positive and negative values).
- Connect the Curve CV socket of the Matrix to either the CV CTRL socket on the audio switch side or the CV CTRL socket on the CV switch side.
- On the front of the Matrix, select Curve and draw positive and negative values to represent each state of the switch. In this example, Steps is set to 2 (so it is alternating between a negative and positive value) and you can control the Resolution to make it go faster or slower.
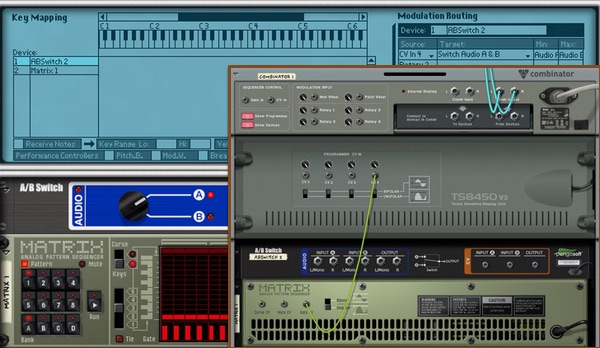
Using the combinator trick
You can also control the device via CV using the Combinator trick:- Put the switch inside a Combinator
- Wire any CV source into the Programmer CV In section of the Combinator (back)
- In the programmer section (front), select the switch as the Device and in the Modulation routing section, select the CV In [N] as the source, the switch (audio, cv or soften) as the target
- In the back of the Combinator, the CV source is the Gate CV from a Matrix and is connected to CV In 4
- In the front of the Combinator, the Device is ABSwitch2, Source is CV In 4, Target is Switch Audio A & B, Min is Audio A on, Max is Audio B on
Tips
#1 - Using Audio Track with A/B Switch
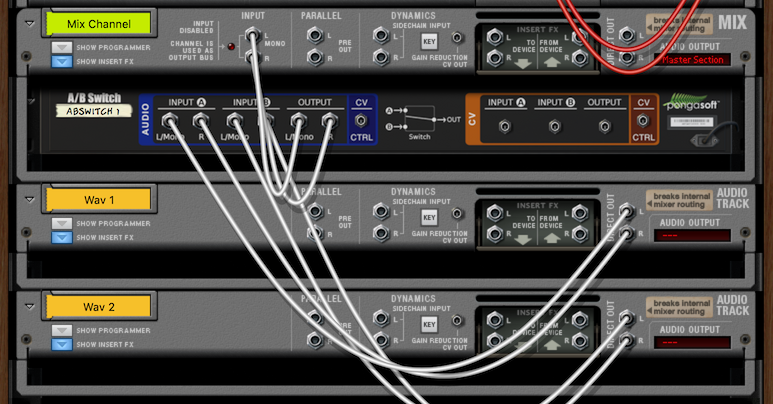
- In order to use an audio track with the A/B switch, you can simply connect the DIRECT OUT sockets of the audio track to one of the Audio Input sockets on the switch.
Sponsor
pongasoft produces a variety of high-quality and free/open source software. If you would like to support my work and help offset the cost of development tools, web hosting, etc., here is how to do so:
- Tip via Ko-fi
- Send money via PayPal
News
A/B Switch2026-03-09
- The project has been moved to Codeberg.
Old News
1.2.0 - 2016/03/13
- You can now control the 2 switches (audio and CV) when the device is folded.
1.1.0 - 2015/03/20
- Added labels for each input (audio and CV) on the front of the device.
- Added CV CTRL sockets for audio and CV to control the device via CV.
1.0.0 - 2015/03/06
- First release.